Get a Let's Encrypt Wildcard Certificate
A quick tutorial on how to get a LetsEncrypt wildcard certificate with your OVH domain by authenticating using DNS with certbot.

It's only been a few years since you had to pay in order to get a trusted SSL Certificate. Then just about 2 years ago, the EFF together with the Mozilla Foundation and several others have decided join forces and launched Let's Encrypt with the goal of having 100% of the web traffic run over HTTPS by issuing domain validated certificates - free of charge!
Fast forward 22 months and let's encrypt is servicing a huge ~50 million certificates. Until a few weeks ago, these were certificates that wouldn't allow wildcards, but that has just changed!
In order for you to get a wildcard certificate, the only valid verification method is DNS based. As such, I thought it would be useful to run through the process of doing this, in my case using OVH's DNS.
Step 1 - Set up Certbot
We'll start off with setting up Certbot on your machine. You can find additional information on the website, however the steps boil down to:
mkdir /root/certbot
cd /root/certbot
wget https://dl.eff.org/certbot-auto
chmod a+x certbot-auto
Finally, run certbot to have it install all required dependencies: ./certbot-auto
That's it. You now have a running version of certbot.
Step 2 - Set up the OVH DNS hook
We'll have to set up the custom hook in order to allow Certbot to automatically verify the domain for wildcard use. Currently it is not possible to validate ownership of a domain for wildcard certificates any other way.
Luckily, antoiner77 has already written a script making this a simple automated process.
git clone https://github.com/antoiner77/letsencrypt.sh-ovh.git
mv letsencrypt.sh-ovh/* /root/certbot/
cd ..
rm -Rf letsencrypt.sh-ovh
cd /root/certbot
chmod 700 manual-auth-hook.py
chmod 700 manual-cleanup-hook.py
mv ovh.conf.demo ovh.conf
chmod 700 ovh.conf
We'll also need to install some dependencies:
apt-get install python-pip
pip install ovh
Now let's generate a OVH API key. In order to do this head on over to OVH's API portal and create a token: https://api.ovh.com/createToken/
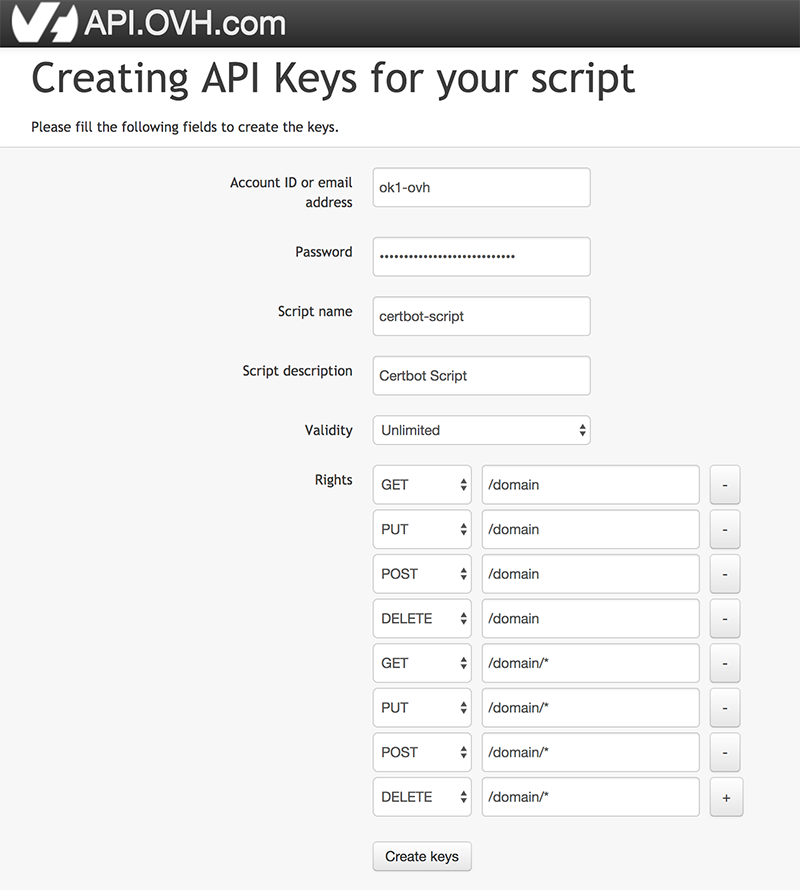
As per the screenshot above, you'll need to request the following scopes:
GET on /domain
POST on /domain
PUT on /domain
DELETE on /domain
GET on /domain/*
POST on /domain/*
PUT on /domain/*
DELETE on /domain/*
Once generated, you'll receive the Application Key, Application Secret and Consumer Key. Keep them safe.
Next, add these to the configuration file:
vi ovh.conf
Step 3 - Get your wildcard certificate!
Now that we've got everything set up, there's only one step left. That's getting your shiny new wildcard certifcate from Let's Encrypt.
Simply run the following command:
./certbot-auto certonly --preferred-challenges dns-01 --manual --manual-auth-hook ./manual-auth-hook.py --manual-cleanup-hook ./manual-cleanup-hook.py -d yourdomain.com -d *.yourdomain.com --server https://acme-v02.api.letsencrypt.org/directory --rsa-key-size 4096 --staple-ocsp
Obviously, replace yourdomain.com with your actual domain :)
Step 4 - Auto renewal
One last optional step is to set up the automatic renewal of the certificate.
Simply edit your crontab by typing: crontab -e
There just add:
32 14 10 * * cd /root/certbot && sh /root/certbot/certbot-auto renew
This will run certbot every 10th of the month at 14:32. As certificates have a 3 month validity, this should be more than enough.
All done
That's it! You should now be able to find your certificate in the LetsEncrypt folder: /etc/letsencrypt/live/yourdomain.com/